
At last, we can install one of the best databases on our Linux servers: SQL Server 2017 supports Linux!
In this article, we will go through the step-by-step installation of SQL Server 2017 on Ubuntu 16.04.
As we will see, the procedure is the same regardless of the SQL Server 2017 edition we install: Enterprise, Standard, Web, Developer, Evaluation or Express.
In our case, we will install the Express edition.
Before starting, remember to open a session as root; otherwise, you will need to add sudo before every command.
Minimum requirements
The minimum requirements are:
- 64-bit system.
- 2 GB of RAM.
- 2 cores at 2 GHz or more.
- 6 GB of disk space.
- File system: EXT4 or XFS.
Configure the repository
First, add the GPG keys
wget -qO- https://packages.microsoft.com/keys/microsoft.asc | sudo apt-key add -
Add the Microsoft repository
sudo add-apt-repository "$(wget -qO- https://packages.microsoft.com/config/ubuntu/16.04/mssql-server-2017.list)"
Install the SQL Server 2017 Express Edition instance
apt-get update
apt-get install -y mssql-server
Initial instance configuration
Run the initial setup.
/opt/mssql/bin/mssql-conf setup
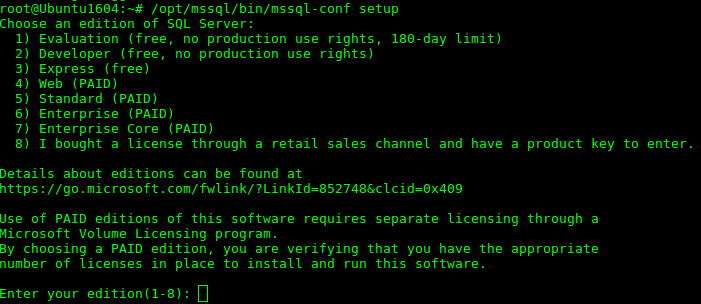
As shown in the image, this is where we choose the SQL Server edition. In our case, we choose “3”, which corresponds to SQL Server 2017 Express Edition.
Next, accept the licence terms with “Yes”.
Enter the instance administrator password for the “sa” user.
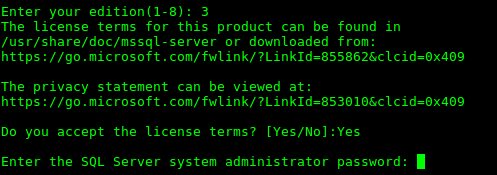
Enter it again to confirm it.
Finally, choose the language, for example “3” for Spanish.
Check that the instance is running
The installation creates a daemon, so we can manage the database like any other server service. To check its status:
systemctl status mssql-server
The instance should already be running.
If it is not, we can use systemctl to start it and make sure it starts at every boot.
systemctl enable mssql-server
systemctl start mssql-server
SQLCMD
To connect to the database instance we have just installed from the command line, we will install SQLCMD, a tool we have already used in Total Administrator to restore SQL Server databases from the command line.
Configure the repository
First, add the GPG keys
wget -qO- https://packages.microsoft.com/keys/microsoft.asc | sudo apt-key add -
Next, add the repository
sudo add-apt-repository "$(wget -qO- https://packages.microsoft.com/config/ubuntu/16.04/prod.list)"
Install SQLCMD
apt-get update
apt-get install -y mssql-tools
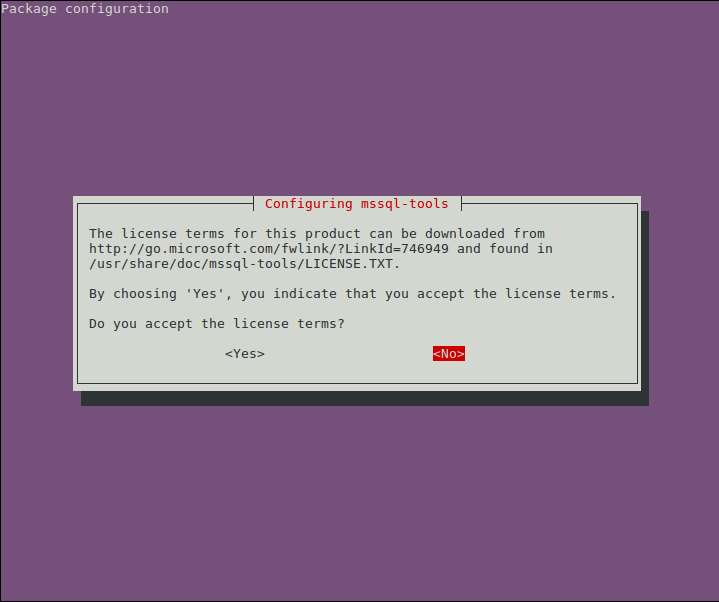
To accept the licence terms, select Yes and also do so on the next screen.
echo 'export PATH="$PATH:/opt/mssql-tools/bin"' >> ~/.bash_profile
echo 'export PATH="$PATH:/opt/mssql-tools/bin"' >> ~/.bashrc
. ~/.bashrc
Test the connection with sqlcmd.
sqlcmd -S localhost -U sa

The SQL Server instance is now installed and ready on Linux.